Class Associations
How to edit the amount of class units, whether or not students have permission to select individual instructors, change the grading basis for classes, add & delete course components for associated classes, view Course Catalog Requisites, and add, delete, or view Class Association Requisites.
Reminder
Association numbers are assigned within Maintain Schedule of Classes on the “Basic Data” tab.
Typically all sections of the same component will be grouped under the same association as long as they will all share the same credit hours and restrictions. If a separate association is required, the association number should generally match the section number (e.g. section -001 in association 1, section -002 in association 2, etc.).
All classes that allow for multiple enrollments in a term, such as special topics or internships, must have every section within its own association.
General Information
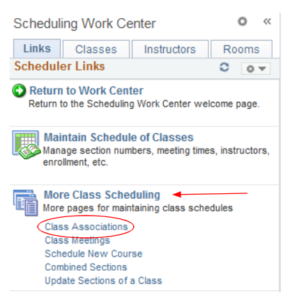
How to Navigate to ‘Class Associations’
- In the Scheduling Work Center, click on the ‘Class Associations’ link under the section titled ‘More Class Scheduling.’
Class Units
Once on the ‘Class Associations’ search page, enter the appropriate subject area and catalog number.
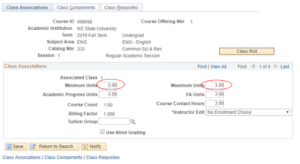
To edit class units, set a range by entering the lowest possible unit value in the ‘Minimum Units’ field and the highest possible unit value in the ‘Maximum Units’ field.
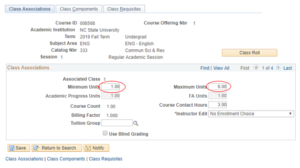
For a class to have the same minimum and maximum units, set both fields to the same number.
*Disclaimer: class units should follow the approved catalog. Varying from the posted catalog allowance is not permitted.
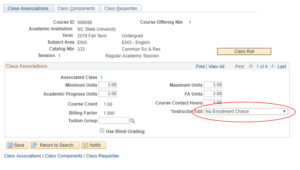
Instructor Edit
To allow students to choose their instructor, change the ‘Instructor Edit’ drop down to ‘Class Instructor Table Edit.’ Most sections will not allow the selection of an instructor, which will have this field state ‘No Enrollment Choice.’
Grading Basis
‘Class Association Components’ lives under the ‘Class Components’ tab. Select the appropriate grading basis for sections within that association.
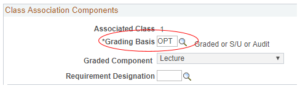
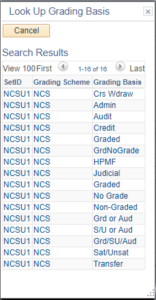
Remember, the grading basis must match the course catalog. Official changes have to be submitted through the Office of Courses, Curricula and Academic Standards for approval by the University Courses and Curricula Committee.
Course Components
To add a component, select the ‘+’ symbol under the ‘Class Components’ section.

Once the new line is created, select the appropriate component from the drop down. Only components listed in the catalog are eligible to be assigned to a class.

To delete a component, simply select the ‘-‘ button and save.
Note: This is also where to set the Final Exam flag for a component. From the drop down box in the above snapshot, select from the options of ‘No’, ‘Yes’, or ‘Last Class Meeting’.
Course Catalog Requisites
Under the ‘Class Requisites’ tab, view the Catalog Requisite that is attached to the course under the section titled, ‘Catalog Requisite.’ These requisites can only be changed after being approved by UCCC.

Class Association Requisites
Class Requisites allow schedulers to add prerequisites, corequisites, or restrictions to an entire class. These restrictions can also include certain groups, such as majors or academic levels. However, they are applied to the entire class, not a custom amount of seats.
To add a class association requisite, either enter the code in the box labeled ‘Requirement Group’, or you can click on the magnifying glass and search for the code of your choice. To remove a code, simply highlight the information listed in the Requirement Group box and delete.
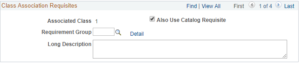
Reminder: Special topics courses should not include additional course requirements not listed in the catalog.